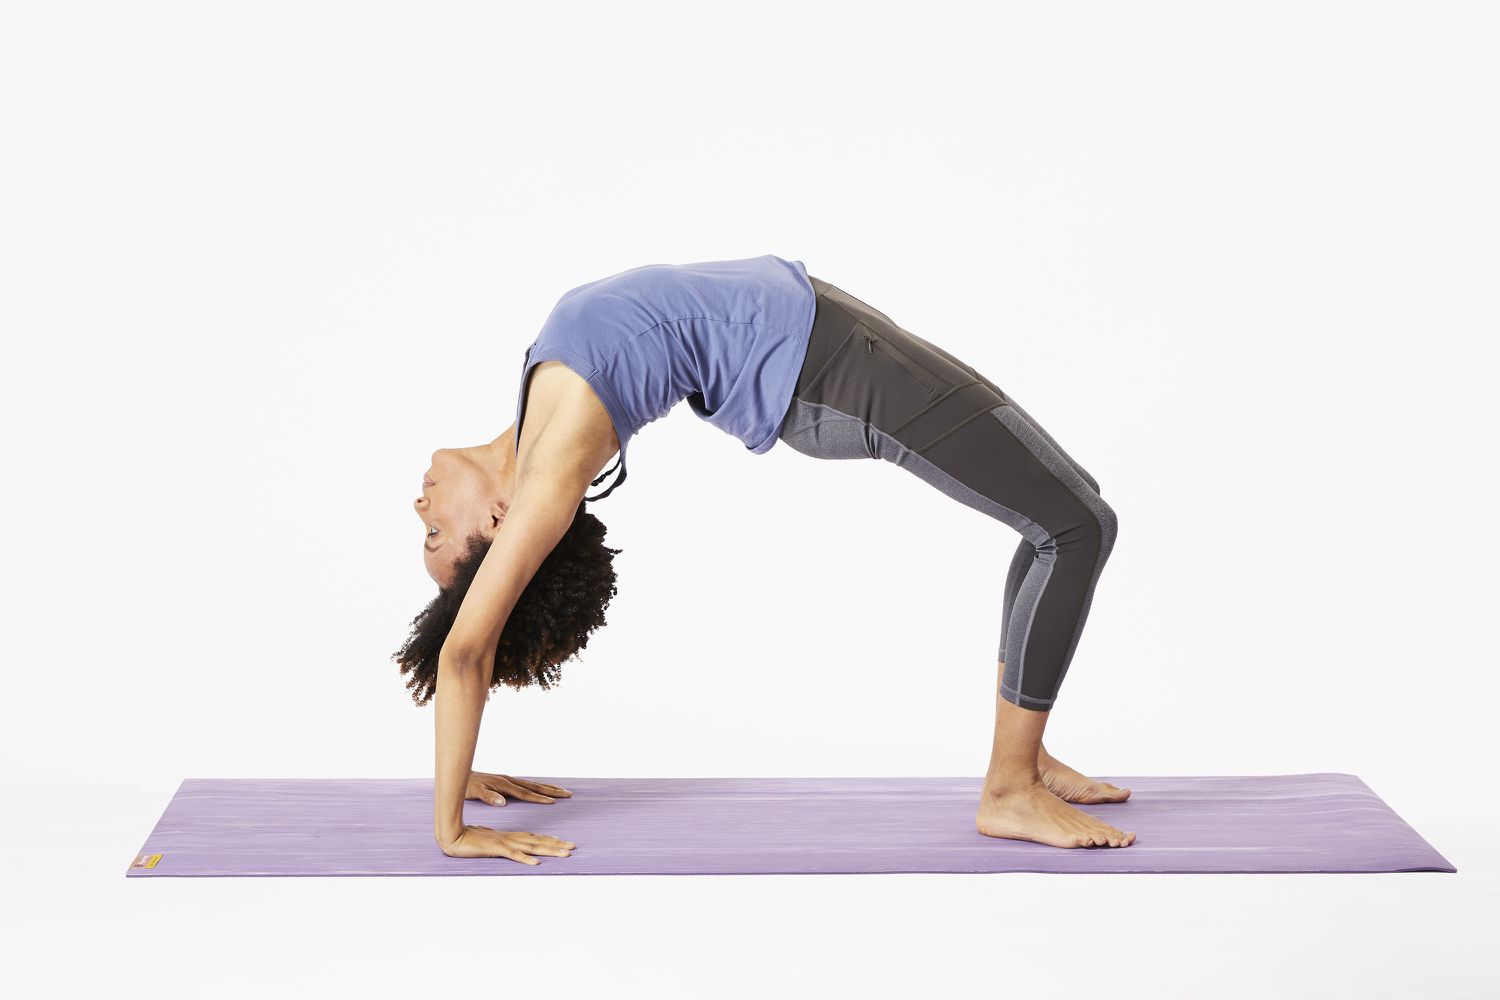
Master this challenging “heart-opener” asana to strengthen your entire body and increase spinal flexibility.
What is Wheel Pose (Urdhva Dhanurasana)?
Are you ready for a wheel-y rad yoga pose to add to your practice? Enter: Wheel Pose, also known as Upward Facing Bow Pose or by its Sanskrit name, Urdhva Dhanurasana.
This is considered an “apex pose,” meaning it’s a challenging asana that other poses build up to. It’s a deep backbend and a powerful “heart-opener” that provides an intense stretch for the entire front of the body—from your chest and shoulders down to your hip flexors and thighs. At the same time, it’s a great way to build strength in your arms, legs, core, and back.

The Benefits of Mastering Wheel Pose
Yoga offers beaucoup benefits for your mind and body. Wheel Pose in particular might help:
Physical Benefits
- Strengthens Full Body: This pose tones and strengthens your core, thighs, glutes, and arms as they work to lift and support your body.
- Increases Flexibility & Mobility: It provides a deep stretch for the spine, shoulders, and hip flexors, which can help alleviate pressure and tension.
- Opens the Chest: As a powerful heart-opener, it stretches the chest muscles (pectorals) and lungs, which can improve breath awareness and capacity.
- Improves Back Pain: For some, strengthening the back and stretching the spine can help improve chronic lower back pain (but must be done safely).
Mental & Emotional Benefits
- Boosts Mood: Deep backbends are known for being energizing. They can promote the production of mood-boosting endorphins.
- Builds Confidence: Safely achieving a challenging pose like Wheel can encourage more confidence and self-esteem, both on and off the mat.
- Encourages Mind-Body Connection: This pose requires full-body awareness and concentration, strengthening your mind-body connection.
Warm-Up: Preparatory Poses & Alternatives
You’re probably not going to nail the Wheel Pose on your first day. And that’s OK! These beginner-friendly asanas offer similar perks and are essential for warming up your spine, shoulders, and hips before you attempt the full pose.
1. Bridge Pose (Setu Bandhasana)
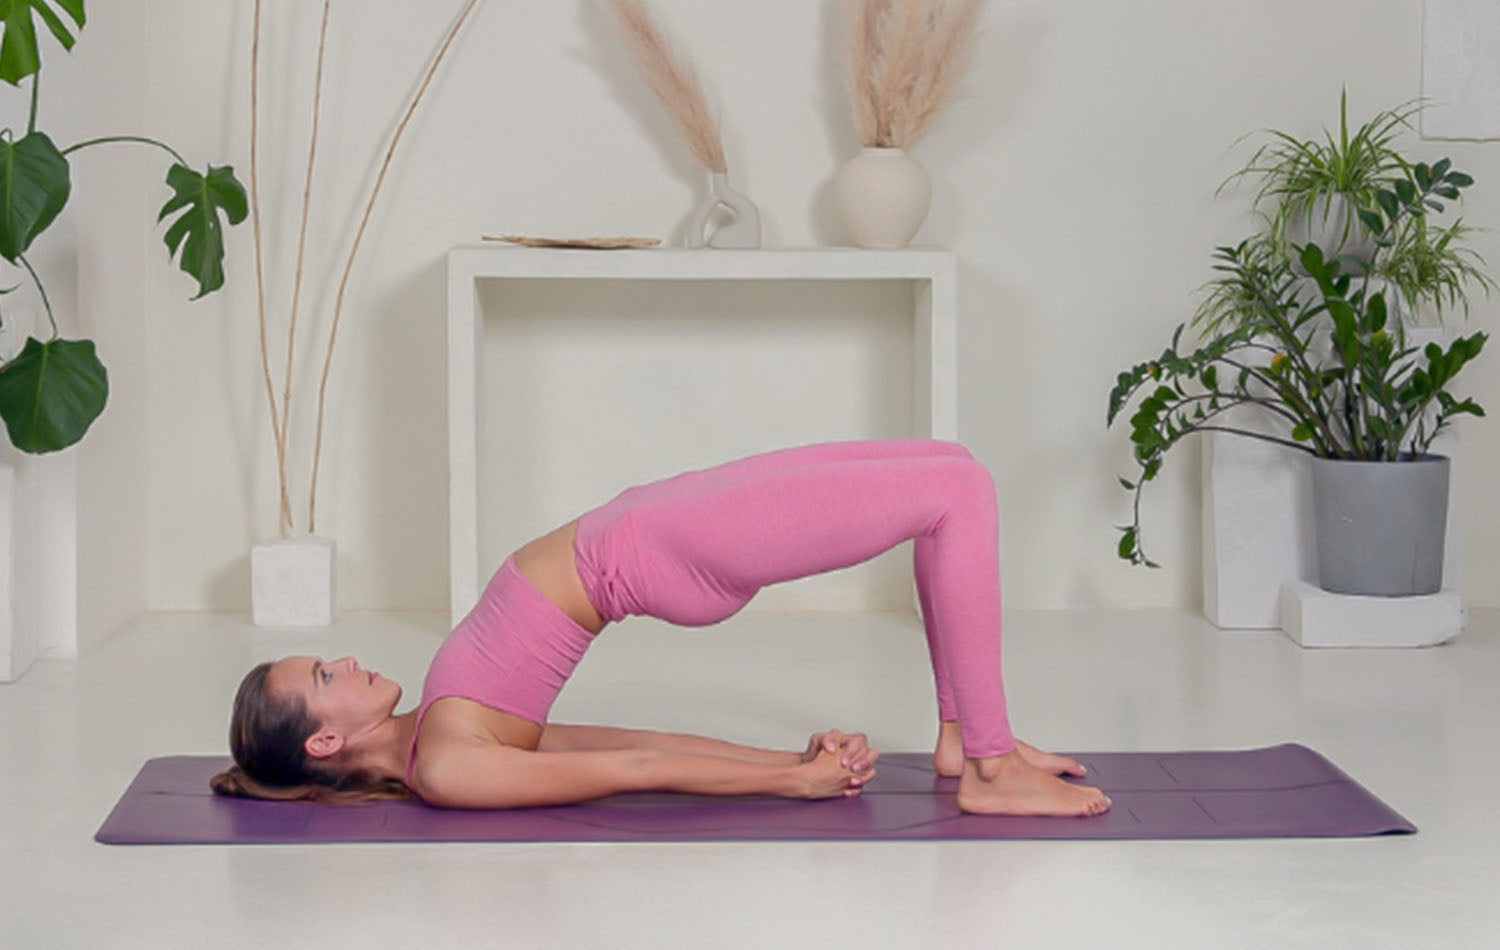
This is the perfect gateway to Wheel. It gently opens the spine and chest while activating your core and glutes.
- Lie on your back, bend your knees, and place feet flat on the floor, hip-width apart.
- Press into your feet to lift your hips off the floor.
- Roll your shoulders underneath you and interlace your fingers.
- Hold for a few breaths, engaging your legs and glutes.
2. Cobra Pose (Bhujangasana)

A solid beginner’s backbend that warms up the spine without any pressure on the arms or wrists.
- Lie on your stomach, palms flat under your shoulders, elbows tucked in.
- Press the tops of your feet into the floor.
- Inhale and lift your chest, keeping your hips on the floor.
- Draw your shoulders back and down.
3. Camel Pose (Ustrasana)
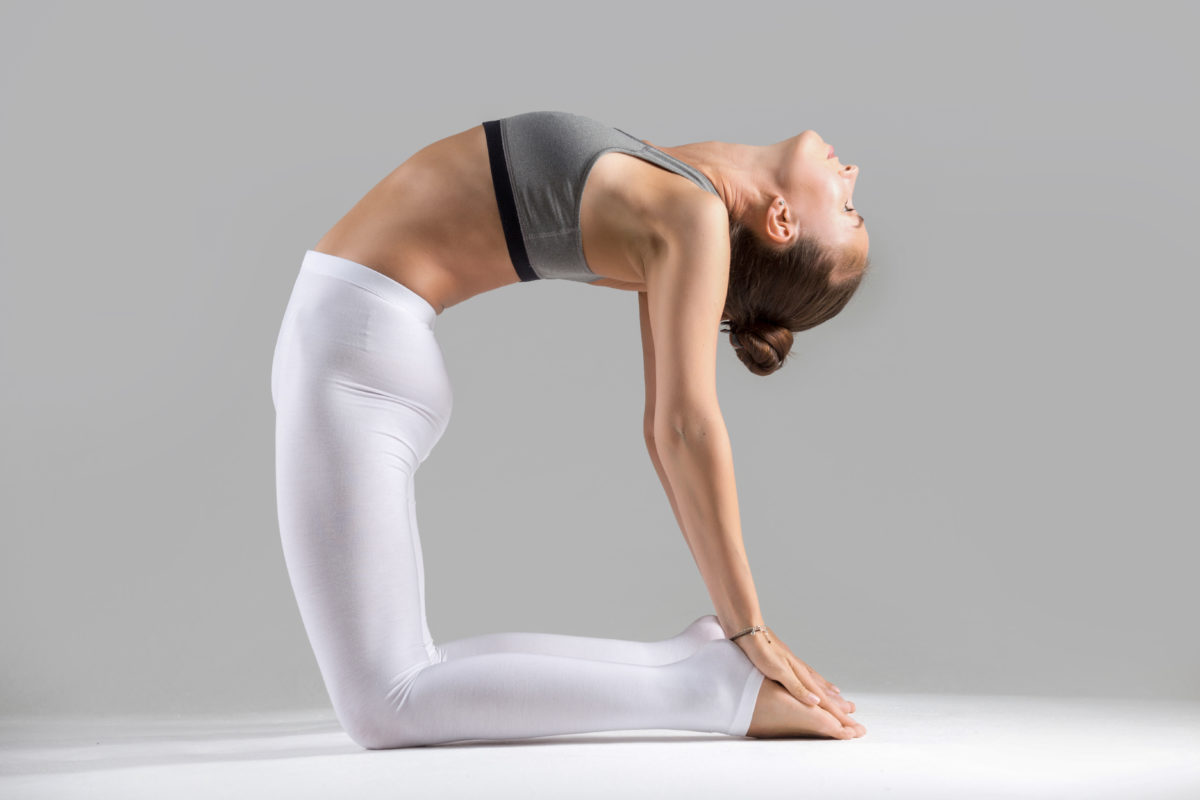
A deeper backbend that prepares you for the “heart-opening” aspect of Wheel.
- Kneel with your hips aligned over your knees.
- Place hands on your lower back, fingers pointing down.
- Inhale, lift your ribcage, and open your chest.
- If you feel open, reach one hand at a time back to your heels.
- Keep hips pushing forward, aligned over your knees.
4. Bow Pose (Dhanurasana)

This pose mimics the “bow” shape of Wheel while lying on your stomach.
- Lie on your stomach. Bend your knees and grab your ankles.
- Inhale, lift your heels away from your glutes.
- This action will lift your chest and thighs off the floor.
- Breathe into your belly.
5. Dolphin Pose (Catur Svanasana)

This pose is crucial for building the shoulder strength and openness required for Wheel.
- Start on your hands and knees. Lower your forearms to the floor.
- Tuck your toes and lift your hips up and back, like Downward Dog.
- Press firmly into your forearms and draw your shoulders away from your ears.
6. Child’s Pose (Balasana)
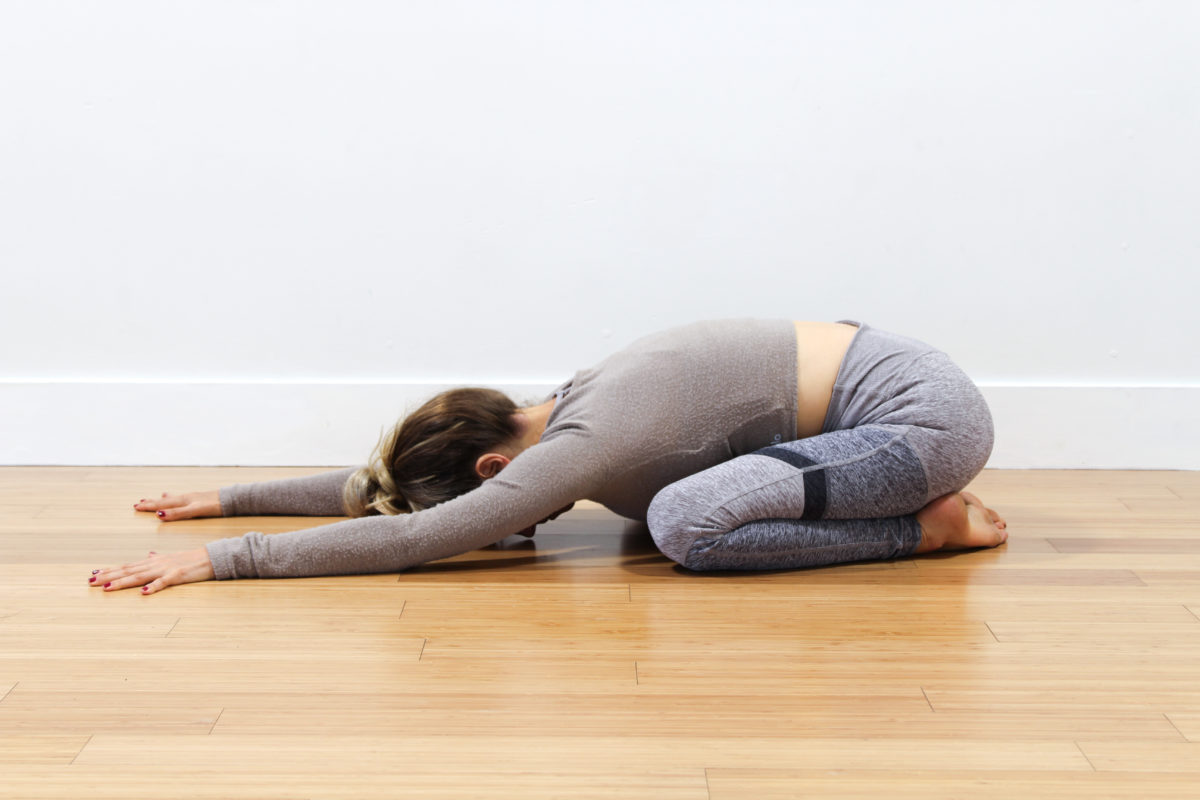
This is a “counter-pose.” Always rest in Child’s Pose after backbends to gently flex the spine in the opposite direction.
- From hands and knees, bring big toes to touch.
- Widen your knees and sit your hips back onto your heels.
- Rest your forehead on the mat.
How to Do the Wheel Pose: A Step-by-Step Guide
The Wheel Pose isn’t normally considered beginner-friendly. So, take it easy and focus on proper form at every step. Ensure you are fully warmed up first.
- Start on Your Back: Lie flat on your back. Bend your knees so the soles of your feet are flat on the ground, hip-width apart and close to your bottom.
- Place Your Hands: Bend your elbows and place your palms flat on the ground just outside your ears, beneath your shoulders. Your fingers should point toward your feet.
- The First Lift (Hips): As you inhale, press down firmly through your feet to lift your hips and lower back off the ground (this is Bridge Pose).
- The Second Lift (Head): Press down through your hands and lift your shoulders, bringing the crown (top) of your head to rest gently on the floor. Do not put weight on your neck.
- Check Alignment: Pause here. Check that your elbows are parallel and haven’t splayed out to the sides. Squeeze them toward each other.
- The Full Lift (Full Wheel): On your next inhale, press strongly into your hands and feet simultaneously. Use the strength of your arms and legs to lift your head completely off the ground.
- Hold the Pose: Straighten your arms as much as you can. Keep your feet parallel and your knees aligned over your feet (don’t let them splay out). Let your head hang gently.
- To Release: Tuck your chin into your chest *first*. Slowly bend your elbows and knees to lower your shoulders, then your hips, back to the floor.
- Rest: Hold for 5-10 breaths (up to 30 seconds). Rest in Child’s Pose or with your knees into your chest to neutralize your spine.
Pro-Tip: Keep your outer thighs firm and actively rotate your upper thighs inward as you lift. This helps keep your knees and feet from splaying out and protects your lower back.

Yoga Wheel Modifications (Beginner to Advanced)
Here’s how you can modify Wheel Pose to make it easier or more difficult.
Beginner Modifications (Making it Easier)
- Use Blocks: Place two yoga blocks against a wall (shoulder-width apart). Place your hands on the blocks instead of the floor. This extra height makes the push-up much easier.
- Use a Strap: Loop a belt or exercise strap around your upper arms (just above the elbows) to hold your arms parallel. This prevents them from splaying outwards.
- Use a Partner: Have a partner stand by your head and place their feet in front of your shoulders. You can grip their ankles for extra support and stability as you push up.
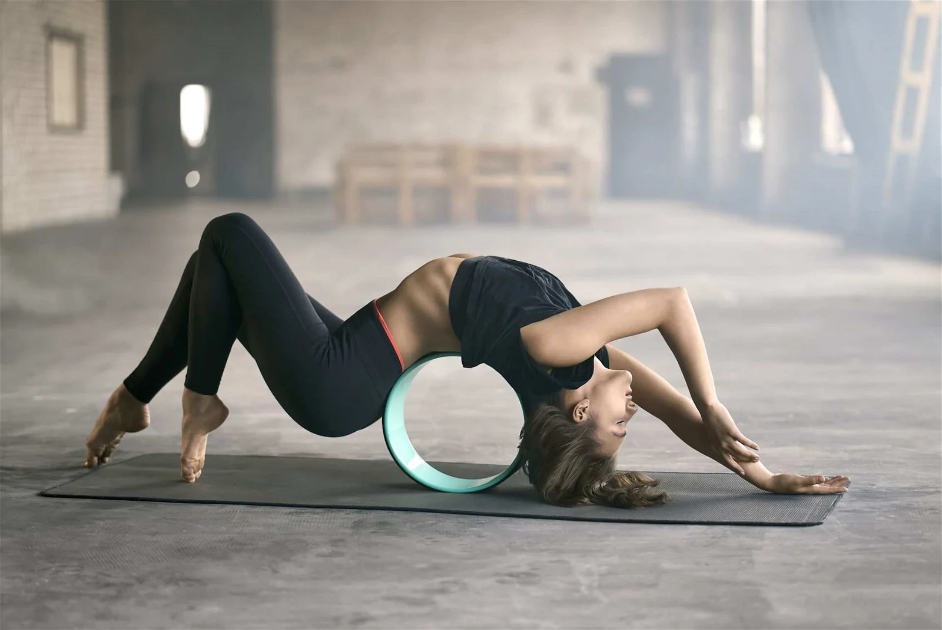
- Use a Yoga Wheel (Prop): Confusingly named, right? A *yoga wheel prop* is a hollow circular aid. You can lie back over the wheel to support your spine, allowing you to get the “heart-opening” stretch without the full-body lift.
Advanced Modifications (Making it Harder)
- One-Legged Wheel: Once you are stable in the full pose, lift one leg straight up to the ceiling. Hold for a moment, then return it to the ground and repeat with your other leg.
- Walk In: From the full pose, carefully walk your feet closer to your hands for a higher, deeper arch.
- From Standing: The most advanced variation is to “drop back” into Wheel from a standing position and then stand back up. *Psst. This one is tough AF and should only be attempted with an experienced instructor.

How Can I Do Wheel Pose Safely? (Contraindications)
You should always be safety-conscious, but a deep back-bending asana like Wheel Pose requires extra awareness.
Who Should Avoid This Pose?
Do not attempt Wheel Pose if you have:
- Wrist injuries (like carpal tunnel syndrome)
- Shoulder injuries (like a rotator cuff tear)
- Uncontrolled high or low blood pressure
- Recent back or spinal injury
- Late-stage pregnancy
If you feel any sharp or shooting pain, especially in your lower back or wrists, come out of the pose immediately.
Tips for a Safe Practice
- Proper Form is Key: Don’t contract your glutes *too* hard (a little activation is good, “clenching” is bad). Over-squeezing can lead to spinal compression.
- Take it Slow: It can take weeks, months, or longer to fully master Wheel Pose. Be patient with the process and don’t be discouraged!
- Don’t Push Past Your Limits: Don’t force yourself to do a full Wheel Pose if you aren’t feeling 10/10. This increases your risk of injury.
- Use Props: Ain’t no shame in the prop game! Hold a yoga block between your thighs (and squeeze it) to protect your knees and keep your legs parallel.
The Bottom Line
Wheel Pose is a challenging yoga move that pushes flexibility in the chest and back. As an intermediate-to-advanced pose, it’s a fantastic gateway to even more advanced asanas. Just be sure to take your time, warm up properly, and don’t push past your limits. The moves (and their benefits) will open up when your body is ready.